It's fair to say that collision detection and resolution are arguably the most important parts of any physics library. A good collision system can make or break any library or game. Several algorithms exist for it with GJK being one of the most popular ones. The collision detection system in my library has 3 steps to build a full manifold, with the first step being GJK.
Overview
- Introduction
- Terminology
- Code
- References
Introduction
So what is GJK?
It was first presented in 1988 as distance algorithm between two convex shapes. When using it for collision detection we are essentially checking for 0 distance, which means they are touching or penetrating each other, and therefore collide.
Advantages and disadvantages
| Pros | Cons |
|---|---|
| Very fast, due to the early-outs it allows for. | By default, it only gives a yes/no answer. There are ways to get more information out of it, especially when the penetration is small, but that'll not be covered here. |
| Works with any convex shape. | Might be hard to grasp at first. |
What does GJK do exactly
- Creates a new shape from the two objects we’re checking for collision.
- Does a set of dot and cross products to determine if the shape contains the origin.
- If it does, the objects collide.
Terminology
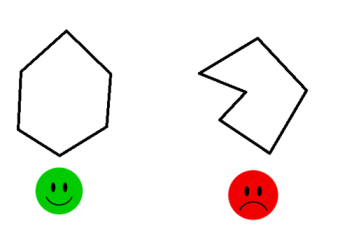
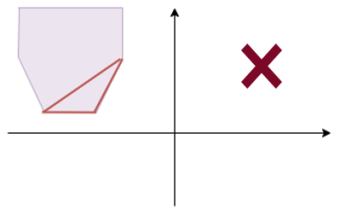
Convex vs Concave shapes
Previously I mentioned convex shapes. In short, with convex shapes you cannot draw a line between any two points that goes outside the shape. In elementary school you might've learned it as "you cannot hide inside it". :)
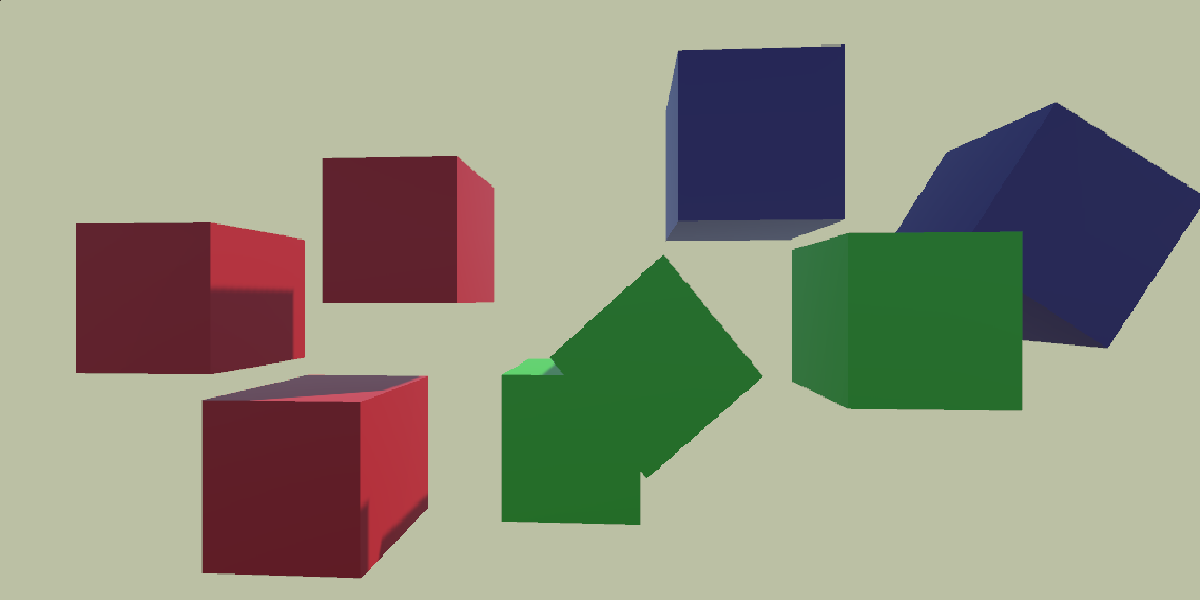
Minkowski sum and difference
Throughout GJK, we will be working with points on the edge of the Minkowski difference. The simple definition of it is "subtracting all points of object B from all points of object A". This does not refer to all vertices but the infinite amount of points on each object. When the objects collide, the Minkowski difference contains the origin, which means they have at least one mutual point. This is because: (x1, y1, z1) - (x2, y2, z2) = (0, 0, 0).
 |
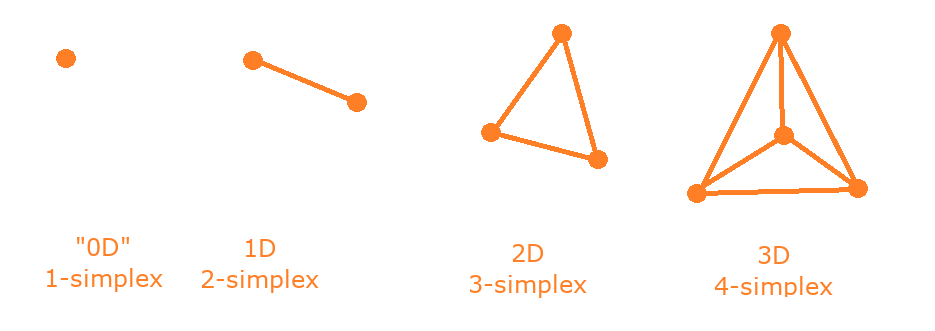
Simplex
This is the above mentioned new shape. In short, a simplex is lowest amount of points that are needed in a given dimension. In n dimension, the number is always n+1. Going from 1D to 3D, we first have a line, then a triangle, then a tetrahedron. As calculating the full Minkowski difference is expensive, we will try to build a simplex inside it and see if it encloses the origin. Every point of the simplex is a point on the Minkowski difference.
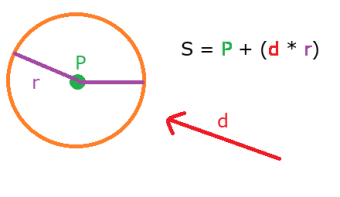
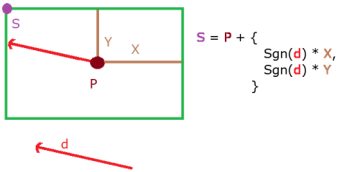
Support functions
Support functions give us "the farthest point on the object in a given direction". We will use this to get new points on the edge Minkowski difference and therefore extend
our simplex. What shapes your GJK works with depends on what support functions you write.
Below are two of the simplest shapes, but I will detail more in the end of the article.
The Minkowski difference is defined as A - B, therefore the points on it will also be defined as A.Support(direction) - B.Support(-direction). (We use -direction because while drawing the Minkowski difference we first flip one of the object) As the support points are the furthest point on an object, it'll be a vertex on the edge of the Minkowski difference, which is how we will build our simplex.
 |
 |
The Algorithm
The Goal
Our main goal is to calculate a simplex inside the Minkowski difference and see if it encloses the origin. While adding points to the simplex we'll be using dot products to make sure that each new point to the simplex can still be "seen" from the origin, therefore has a chance to help enclose the origin. If at one iteration we end up with a direction that has no chance of producing points that give us such points, the algorithm does an early-out. Otherwise, (since we're working in 3D) it'll build a tetrahedron that encloses the origin.
 |
 |
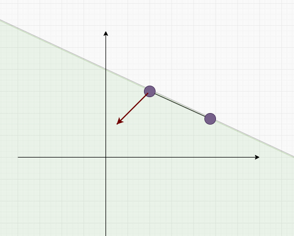
The main loop
Every loop we add a new point to our simplex. Each support point added needs to be visible from the origin in the search direction. In this picture, you can see that the direction (the arrow) points in the direction of the origin. This means that it has a positive dot product with the last added support point. If it is not visible (the dot product is negative), we have no intersection, as searching in that direction would not help us enclose the origin.
The first point
For this, we can use any normalized direction we want (e.g. (1, 0, 0) ). The support point gets added to our simplex and the new search direction is the opposite of the support point.This is so we can check which "side" of the support point the origin is on in the next step.
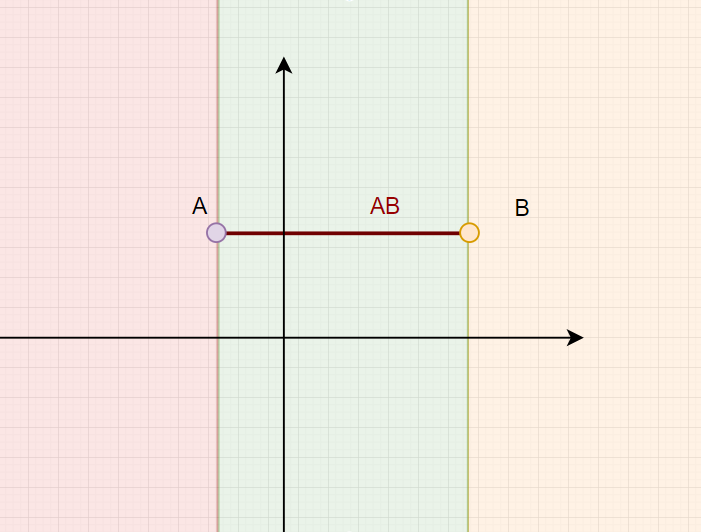
The second point: a line
Now we have a line between A and B, with A being the latest point that was added. Now our world is divided up to 3 regions: the area past B (the first added point), the area between A and B, and the area past A. Our goal is to figure out which of these 3 the origin is in.
- The area past B
Remember that in the first point, new search direction was the opposite of B and from the dot product in the main loop we know that -B and A and point toward the origin, therefore the area past B cannot contain the origin.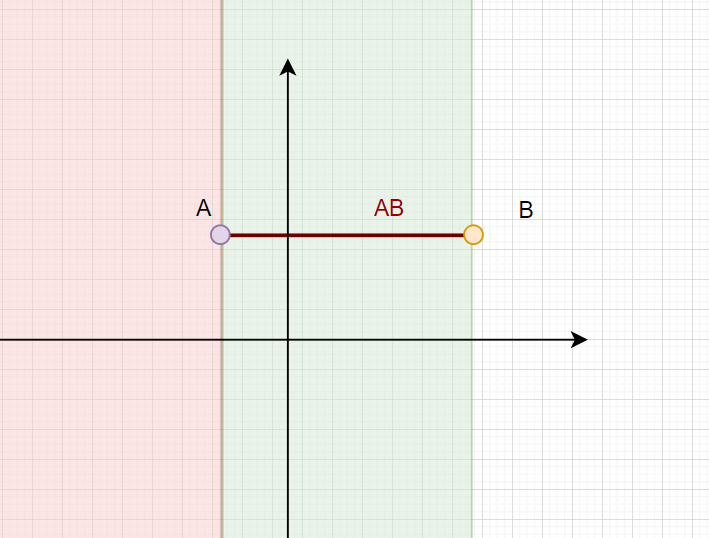
- The area between A and B
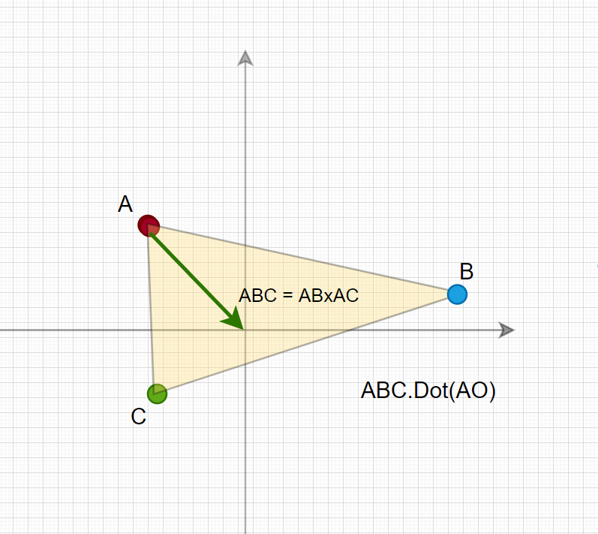
To see if this is the area that contains the origin, we need to dot AB with AO. As AO is pointing towards to origin, a positive dot product means that the origin is somewhere between this area. In this case, our new search direction is perpendicular to AB (the black arrow on the picture). The reason for this, is because this area can now be divided up to 2 new regions using this vector. As our cross product includes AO, that is a vector that points towards the origin, we know that the origin will be in the resulting area.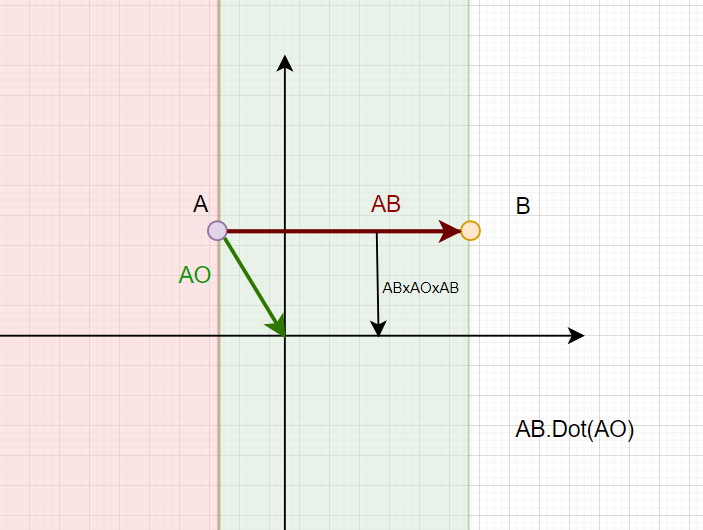
- The area past A
If the origin is not between AB (and it is definitely not past B), it has to be past A. In this case, B is not in the area that encloses the origin and therefore is not useful for our simplex, so we discard it. Now we are back to our 1-simplex.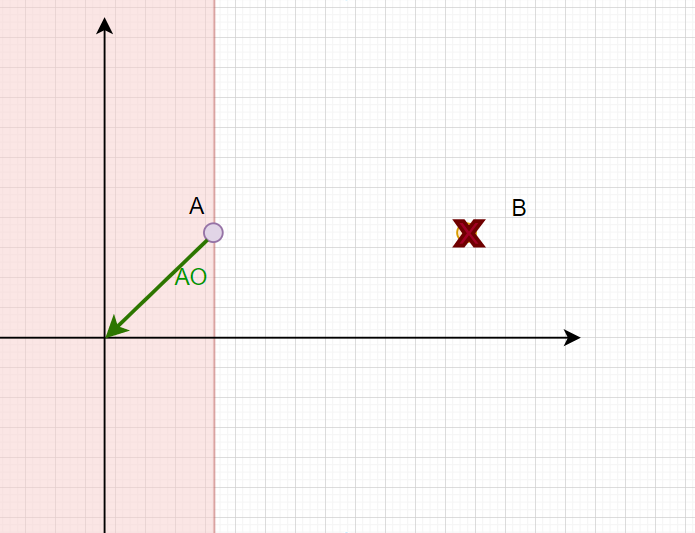
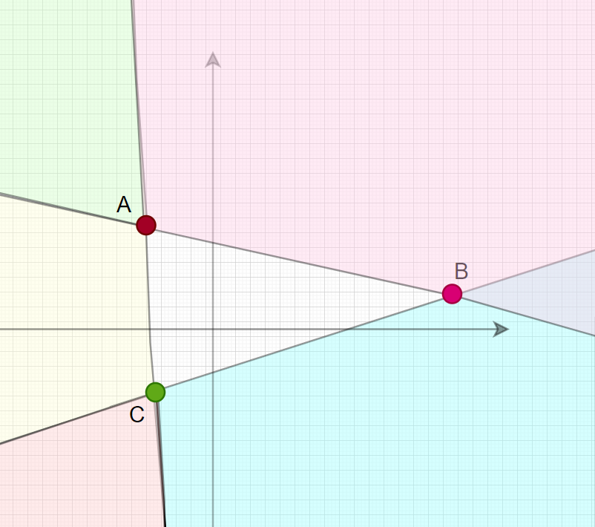
The third point: a triangle
Regions:
We have 8 regions here: 3 past each side of the triangle, 3 past each point, and (since we're in 3D) the area above and below the triangle. However, similarly to the line case, we can exclude some regions.
As before, A is once again the latest point added. This means that we can exclude the areas past B and C (as those were checked in the previous case) and the area past CB, as the cross products in the previous step determined which side of the line the origin is on.
The normal of each side is determined by a cross product. ABC refers to the normal of the triangle so crossing them with the sides gives us the normal vector perpendicular to the side.
 |
 |
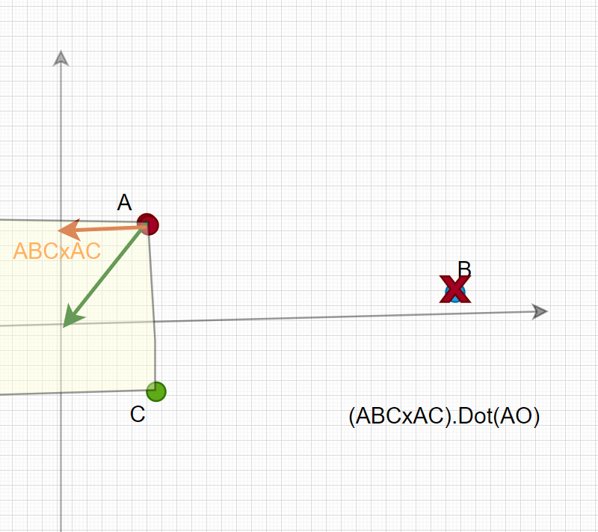
- The area between the first and the last point added
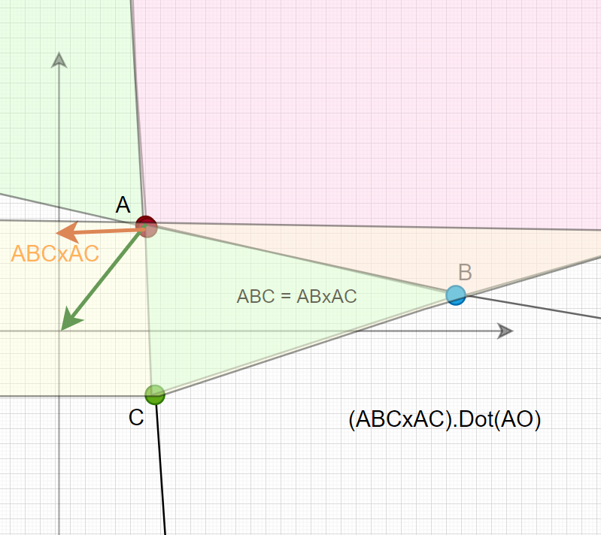
Here we have 2 areas to check: The area in the direction of ABCxAC and behind it. As previously, we dot the normal (ABCxAC) with the last support point, referred to as AO.
There are two options here: the area past AC or the area towards B. Dotting AC and AO helps determine this. If it is in the area past AC, we discard B and our new search direction is perpendicular to AC. If not, discard C and fall back to the line case with the same search direction.
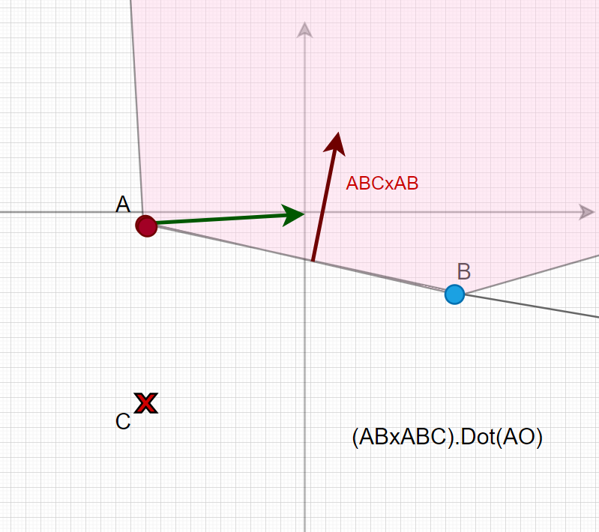
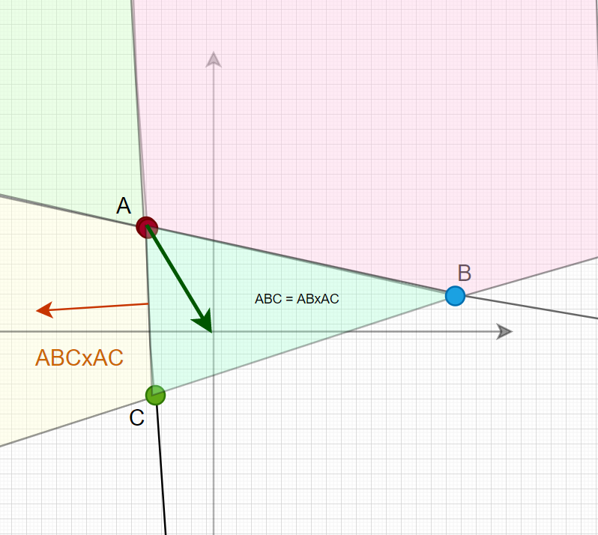
- The area between the second and last point added
Similar to the previous case, we have 2 areas to check: ABCxAB and the triangle's area.
If ABCxAB is in the direction of AO, C is discarded and we fall back to the line case. Otherwise the triangle's area contains the origin and we need to see which side of it the origin is on.
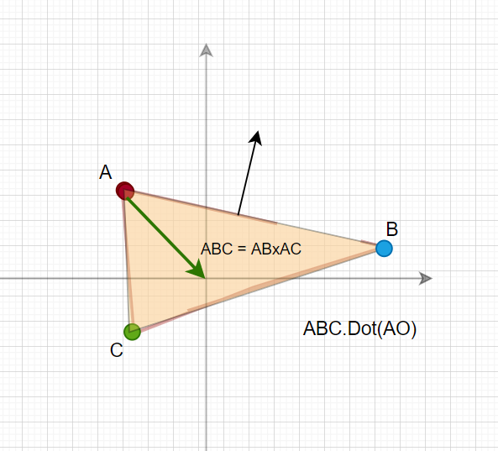
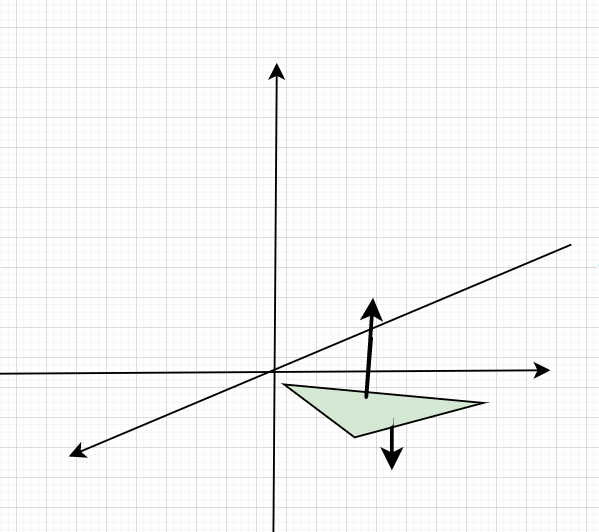
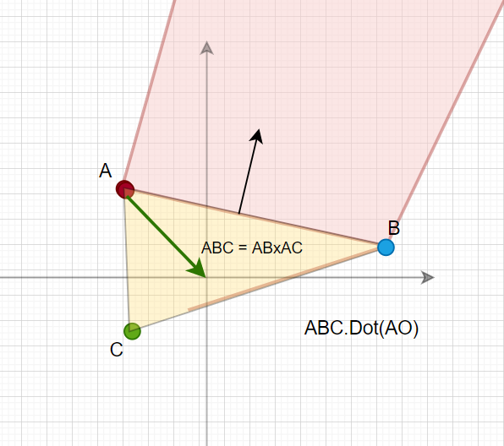
- The ares above and below the triangle
In this case we once again have two areas to check: above and below the triangle. To figure out which side the origin is on, we simply dot ABC with AO. If it's above, (gives a positive dot product) the new search direction is ABC. If it is below, the triangle is flipped so the new simplex is (A, C, B) and the new search direction is -ABC. Now we can proceed to the last phase, which is a tetrahedron.

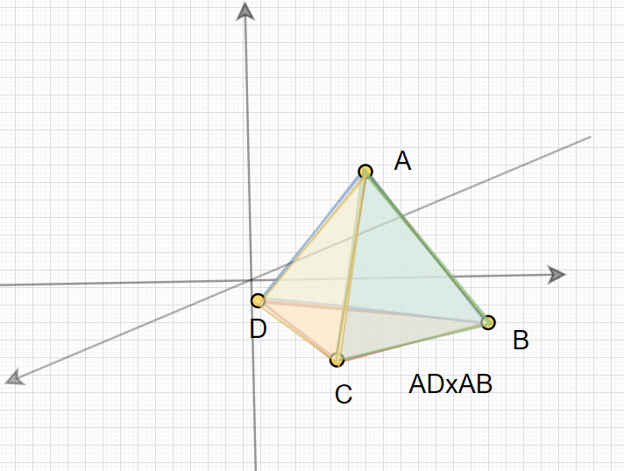
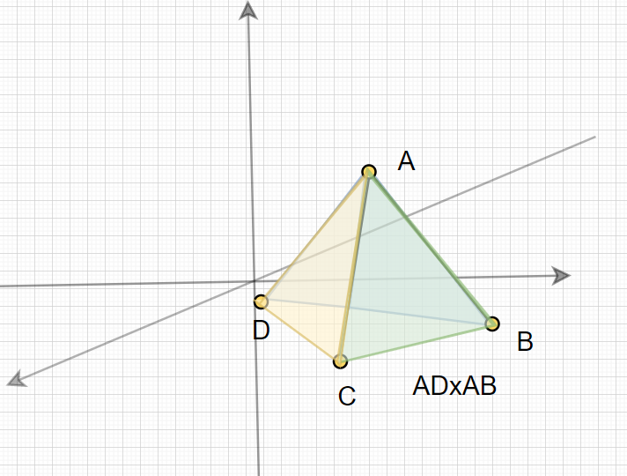
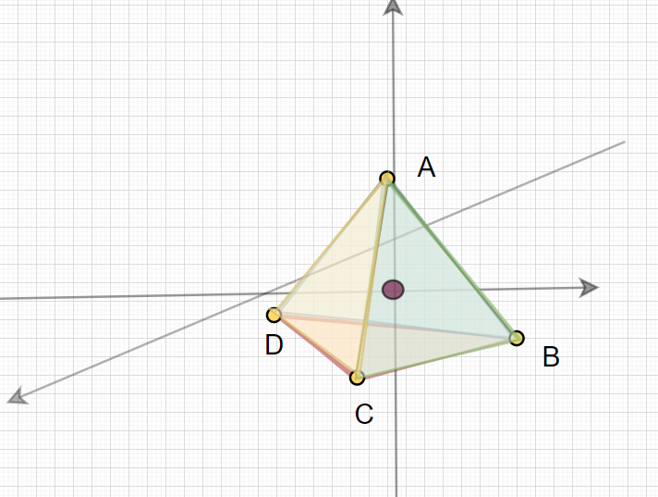
The fourth point: a tetrahedron
We have 4 regions here: the 4 sides of a tetrahedron. We can exclude the BCD triangle, as we already know that the origin is "above" it (that is, it points towards the latest support point).
 |
 |

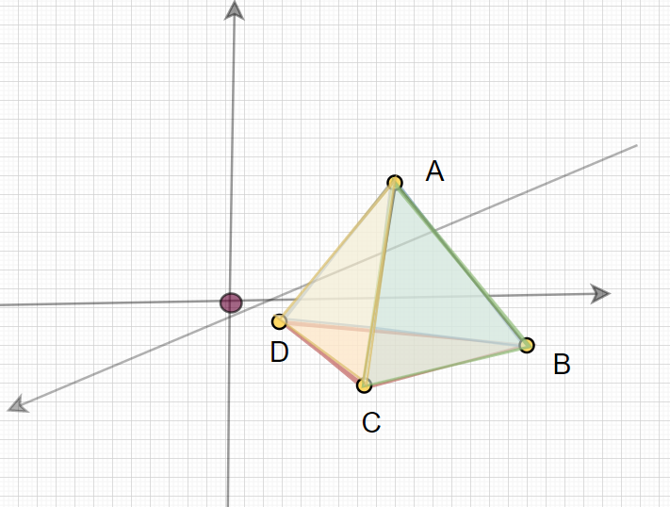
At the end, we'll end up with one of these situations:
 |
 |
As we've learned before, if the tetrahedron encloses the origin (picture on the left), we have a collision.
And that's it for the main algorithm! Now let's look at some code:
The Code
The code shown below is from my own physics library called Cinkes. Some lines were simplified for easier understanding.
Simplex:
Our simplex in 3D consists of 4 points, which is the space we reserve for it in the beginning. Note that when adding a new point we always add it as the first point of the array. This is because an important thing we need to know is the order the points were added to the simplex. Knowing that the one at index 0 is the latest (the one called A in the previous section), makes our work a lot easier.
class CSimplex
{
private:
	std::vector<CVector3> m_Points;

public:
	CSimplex() { m_Points.reserve(4); }
	void Push_Front(const CVector3& a_Vector3)
	{
		m_Points.insert(m_Points.begin(), a_Vector3);
	}

}
The main loop
We start the main loop by making sure our new search direction (next) is normalized then add the new support point, returning false if we moved away from the origin. The NextPoint() function is essentially our algorithm. It keeps returning false until it gets to the tetrahedron case, where it can definitely determine whether or not there is a collision.
while(true)
	{
	next.Normalize();
	CVector3 A = a_Object1->Support(next);
	CVector3 B = a_Object2->Support((next * -1));
	CVector3 support = A - B;

	if(support.Dot(next) <= 0) {
			a_Simplex = simplex;
			return false;
	}
	simplex.Push_Front(support);

	if(NextPoint(simplex, next)) {
			a_Simplex = simplex;
			return true;
	}
	}
NextPoint()
This is a rather simple function and it's only task is to determine which function to call, based on the size of the simplex
NextPoint(CSimplex& a_Simplex, CVector3& a_Direction)
{
switch (a_Simplex.Size())
{
case 2: return Line(a_Simplex, a_Direction);
case 3: return Triangle(a_Simplex, a_Direction);
case 4: return Tetrahedron(a_Simplex, a_Direction);
default: return false;
}
}
SameDirection()
This is something you'll see often in the following functions. It's only task is to determine whether or not the vector is in the general direction of the new support point.
SameDirection(const CVector3& a_Direction, const CVector3& a_AO)
{
	return a_Direction.Dot(a_AO) > 0;
}
The first point
For the first point you can use any search direction you want. In the case below I've chosen (1, 0, 0), but it can be any normalized vector.
CVector3 next = CVector3(1, 0, 0);
CVector3 A = a_Object1->Support(next);
CVector3 B = a_Object2->Support((next * -1));
CVector3 support = A - B;

CSimplex simplex;
simplex.Push_Front(support);

next = support * -1;
The second point: a line
For simplicity, we'll always shorten the simplex points to a,b,c,d variables. Here, you can also see the effect of using Push_Front(), as we know that index 0 denotes a. We also use the SameDirection() function as a shorthand for the dot products. As this (and the triangle) cannot determine whether or not there is a collision it can only return false.
Line(CSimplex& a_Simplex, CVector& a_Direction)
{
CVector3 a = a_Simplex[0];
CVector3 b = a_Simplex[1];
CVector3 ab = b - a;
CVector3 ao = a * -1;

if(SameDirection(ab, ao))
	{
		a_Direction = ab.Cross(ao).Cross(ab);
	} else
	{

	a_Simplex = { a };
	a_Direction = ao;
	}


	return false;
}
The third point: a triangle
We start by looking at the area perpendicular to AC, then the one perpendicular to AB.If either this, or the area with the normal ABxABC dotted with AO returns true, one of the points is discarded.
CVector3 a = a_Simplex[0];
CVector3 b = a_Simplex[1];
CVector3 c = a_Simplex[2];
CVector3 ab = b - a;
CVector3 ac = c - a;
CVector3 ao = a * -1;
CVector3 abc = ab.Cross(ac);

if(SameDirection(abc.Cross(ac),ao)) {
if(SameDirection(ac, ao)) {
	a_Simplex = { a,c };
	a_Direction = ac.Cross(ao).Cross(ac);
}
else {
	a_Simplex = { a,b };
	return Line(a_Simplex, a_Direction);
}
}
else {
if (SameDirection(ab.Cross(abc), ao)) {
	 a_Simplex = { a,b };
	return Line(a_Simplex, a_Direction);
}
else {
	if (SameDirection(abc, ao)) {
		a_Direction = abc;
	}
	else {
		a_Simplex = { a,c,b };
		a_Direction = abc * -1;
	}
}
}
return false;
}
The fourth point: a tetrahedron
The tetrahedron is the only function that can return true, and therefore determine a positive collision. We are checking 3 sides of the shape (one we excluded already) and if all tests pass, we have a collision.
Tetrahedron(CSimplex& a_Simplex, CVector& a_Direction)
{
CVector3 a = a_Simplex[0];
CVector3 b = a_Simplex[1];
CVector3 c = a_Simplex[2];
CVector3 d = a_Simplex[3];
CVector3 ab = b - a;
CVector3 ac = c - a;
CVector3 ad = d - a;
CVector3 ao = a * -1;
CVector3 abc = ab.Cross(ac);
CVector3 acd = ac.Cross(ad);
CVector3 adb = ad.Cross(ab);
if(SameDirection(abc, ao))
{
	a_Simplex = { a,b,c };
	return Triangle(a_Simplex, a_Direction);
}
if(SameDirection(acd, ao))
{
	a_Simplex = { a,c,d };
	return Triangle(a_Simplex, a_Direction);
}
if(SameDirection(adb, ao))
{
	a_Simplex = { a,d,b };
	return Triangle(a_Simplex, a_Direction);
}
return true;
}
Support functions
In the terminology section I mentioned the support functions for a sphere and a box. Now let's look at some other shapes.
Convex hulls
Maybe the simplest one is the convex hull. It's a polytope that consist of an arbitrary number of vertices that form a convex shape. A box is also a convex hull, but it has it's own equation, to speed up the process. The generalized form is dotting all vertices with the direction vector. The one with the largest dot product is the support point. There are some ways to speed this up, however I will not go into that here
Cones and Cylinders
These are rather complicated and outside the scope of this article. I'll explain it as easy as I can in the images below.
Local to world space
You might've noticed that all these support functions work in local space, while we are working in global space. Therefore we need to pass the direction vector in local space and convert the result back to world space. This is the equation form:
Or in code:
CVector3 support =
	object.getRotation() * (Support(object.getRotation().Inverse() * direction))
	+ object.getPosition()
And that's it! You can see the full algorithm on my Github page.
In the next article, we will discuss the contact normal, penetration depth and incremental manifolds.